January 31, 2010

Sheets + T-Shirts = Hello Kitty Pillow

From age 4-7, there was one thing I looked forward to the most, going to the Hello Kitty Store. I rarely got anything but the smell alone was enough to bring a smile to my face. Clean, classic, and fun Hello Kitty is a perfect example of my style.


Step 1: Folded kid's drawing paper in half and attempted to sketch one half of Kitty's head, bow, & bow center circle(just traced a kiddie cup). Cut shapes out with paper still folded leaving me with symmetrical halves of each. Fabric=a thin bed sheet my neighbor gave me to cut up for rags. I layered four pieces of sheet then pinned the patterns through all four layers.


Step 2: Using white thread I stitched around my patterns leaving an opening large enough to stuff the fluff inside. I used the presser foot's edge as the guide keeping my stitches straight and equal distance around the pattern.

Step 4: I typed "how to draw Hello Kitty" in Google to be sure it would looked like the real deal. Then used these references to measured out each facial element. The eyes and whiskers=old Loudon Speedway tank top, and nose=gold Rotary Club t-shirt scrap. I simply attached the t-shirt pieces with stitch witchery.


Step 5: Stuffed all three pieces and handed stitched the openings. I made Kitty's head very firm, the bow was about half capacity. I inserted a circular piece of cardboard in the center circle to allow it to sit flat on the bow surface.


Step 6: Because I had no fabric I loved for the bow color I decided to make it capable of being removed and slip covered with minimal stitching. Little Kitty and I sewed hooks on big Kitty as well as the bow base to allow fabric to be easily interchanged.


Step 7: Repeated steps 1 & 2 with the bow pattern and the only fabric that came close to matching my bedding. Carefully I squished the bow form inside the slip cover and hand stitched the bottom. I'll keep the pattern around for when the perfect fabric shows up.


My Hello Kitty Pillow

Take this idea and make your favorite character or make one up. You can use any old rag to make a non-traditionally sweet decorative accent.


January 27, 2010

Old Sweater Becomes Leg Warmers

I took this old green sweater a friend gave me and decided to make it into cozy leg warmers.

Step 1: Use a seam ripper (or scissors) to remove each arm from the sweater. Be careful the ends will quickly begin to unravel. Now take the remaining sweater vest and put it away, this could end up being a matching hat.


Step 2: Determine how tight you want the top of the leg warmer, by stretching a piece of elastic around your calf. Be sure to leave an extra inch for sewing it together. Sew a piece of material (mine is left over from hemming curtains)to go around the elastic strip leaving plenty of extra fabric for when it's stretched. Now connect the elastic inside the fabric together followed by the fabric with a hand stitch.


Step 3: Turn the sweater sleeves inside out and hand stitch the piece of covered elastic to the smaller wrist section of the soon to be leg warmer. I made the top stitch pretty thorough then just did large stitches with Xs, it reminds me of a Free People type embellishment.


Step 4: While sleeve is still inside out fold over opposite end and sew around with machine using same thread color as sweater. It doesn't have to be perfect because it'll be scrunchy bunchy at your foot

Step 5: Put on your new leg warmers over skinny jeans, with a skirt, or however you want. You could thread a ribbon through the top or sew large buttons down the sides. Get creative and have fun.
Now you can practice Plies and Pirouettes anywhere!

January 1, 2010

My Story


As a child, I regarded my mother as a modern-day incarnation of my most beloved fairy tale character, the nameless but beautiful young maiden who, after a visit from Rumplestiltskin, could spin straw into pure gold. Head down, she would sit at the enormous sewing cabinet transforming scraps of cloth, ribbons, buttons and snaps into dazzling costumes, dresses, and decorations. For hours on end, I would sit, enthralled, watching the needle dart in and out, mending, hemming, and administering to anything that demanded a stitch. I longed to learn that magic, and waited anxiously for the day that my feet would be able to reach the pedal and I, too, could create beautiful things.


Over the years, though, the excitement of sewing wore off, and by the time I entered my teenage years, the very idea of wearing anything homemade was horrifying. All of that changed, however, when I found myself living far from home as a single mom with almost no free time and even less expendable money for fashionable clothes. After lamenting my desperate lack of fun and new attire to my closest friend, she showed up for a weekend visit dragging two overstuffed suitcases filled with her old clothes for me.


As we dug through the contents of her bags, she pointed out the numerous alterations she had made to the garments in order to give them a more customized fit or look. “Just by shifting the button over two inches,” she said as she pulled a jacket out of her suitcase and held it up for me, “You can create an entirely different shape and a much more edgy feel.” She held up a cute party dress and pointed to the hem, “I tucked the skirt underneath and stitched it in a few places, and voila!”


Suddenly, the old dresses hanging in my closet didn’t seem so frumpy and lifeless. As soon as my friend left, I fished my tackle box sewing kit out of the junk closet, and cautiously tried a few hand stitches. After several days, I had one quasi-altered dress, a tee shirt in four pieces on the floor, and more frustration than I knew what to do with.


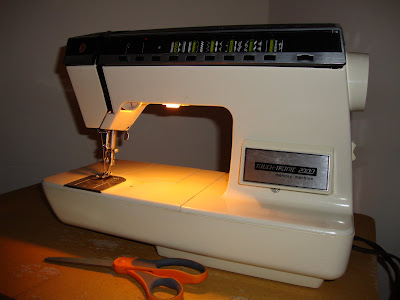
In the months since my reintroduction to sewing and crafting, I have taken up the hobby with new vigor and energy. With the help of my mother’s sewing machine, a 1975 Singer Touch-Tronic, I have transformed old sweaters into leg warmers suitable for the finest ballerina’s pirouettes and tailored old, awkwardly shaped tee shirts with custom-fit capped sleeves. Drawing inspiration from television, books, and the Internet, I have sewed, reconstructed, and crafted my way back towards my childhood aspirations. I have even found a way to incorporate my love of photography and my knowledge of the Internet into the mix: I recently started a blog called Make It Crafty, where I am able to share my ideas and creations with my friends and the general public.


Although I take great pride in the Hello Kitty pillow that I painstakingly crafted, it’s the life lessons that I’ve learned along the way that have been the most valuable: take your time, be patient, and try to see the potential in things. While I still find myself occasionally frustrated, I understand that allowing screw-ups to be part of the process keeps the pressure off and that, like most things, achieving perfection is nearly impossible.